> ## Documentation Index
> Fetch the complete documentation index at: https://docs.intelagent.ca/llms.txt
> Use this file to discover all available pages before exploring further.
# WOHS Onboarding
> Create your account, enrol in William Osler reimbursement, and add your bank account — a self-service setup for William Osler physicians
## Overview
William Osler physicians are reimbursed by **EFT** for services provided to uninsured patients. Setting up is **self-service** — create your account, choose the William Osler reimbursement program, and add the bank account your reimbursements are deposited to. **No subscription, credit card, or MC EDT designation is required.**
IntelAGENT guides you through it in the **onboarding wizard**, which opens right after you sign up. You can return to it any time from the user menu → **User Onboarding**.
A printable, shareable walkthrough of everything on this page plus updating your banking on desktop and mobile.
## Create your account
Sign up at [app.intelagent.ca/register](https://app.intelagent.ca/register). Enter your name, email, and a password (at least 8 characters), then click **Continue** — you'll go straight into the onboarding wizard.
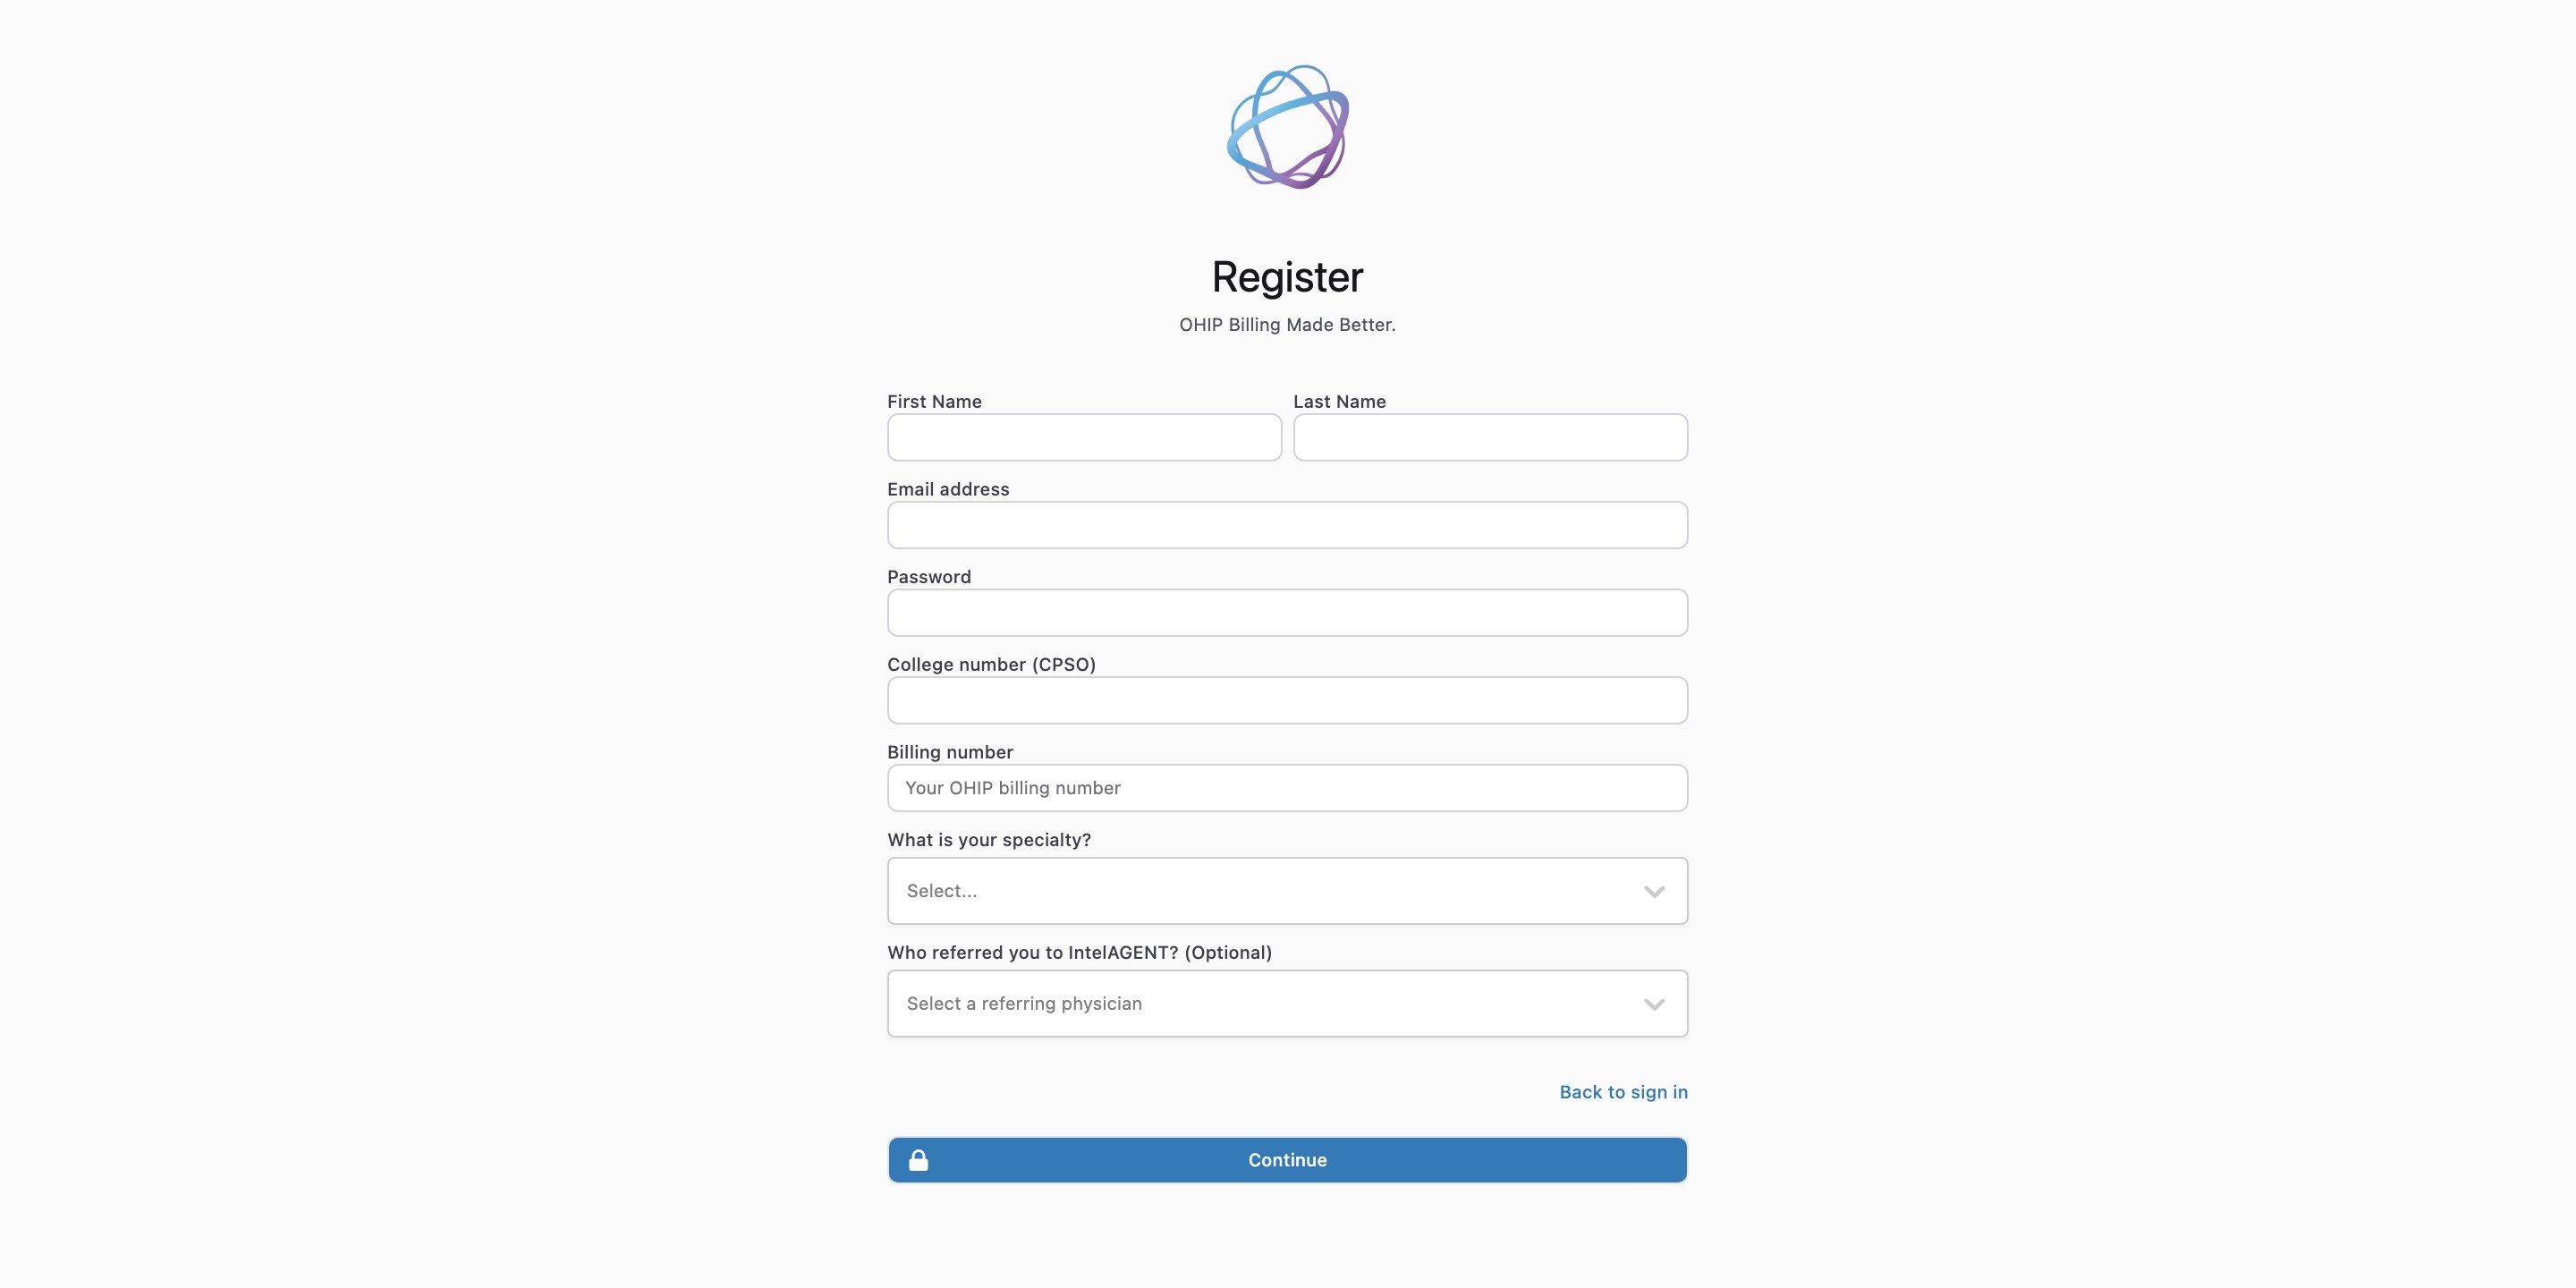 Register with your **`@williamoslerhs.ca` email address** — that's what unlocks the **William Osler reimbursement** option in the next step. If you sign up with a different email, that option is disabled; contact the Medical Affairs office to be set up.
## Step 1 — Choose William Osler reimbursement
On **Choose your billing program(s)**, select **William Osler reimbursement**, then click **Confirm & continue**.
Register with your **`@williamoslerhs.ca` email address** — that's what unlocks the **William Osler reimbursement** option in the next step. If you sign up with a different email, that option is disabled; contact the Medical Affairs office to be set up.
## Step 1 — Choose William Osler reimbursement
On **Choose your billing program(s)**, select **William Osler reimbursement**, then click **Confirm & continue**.
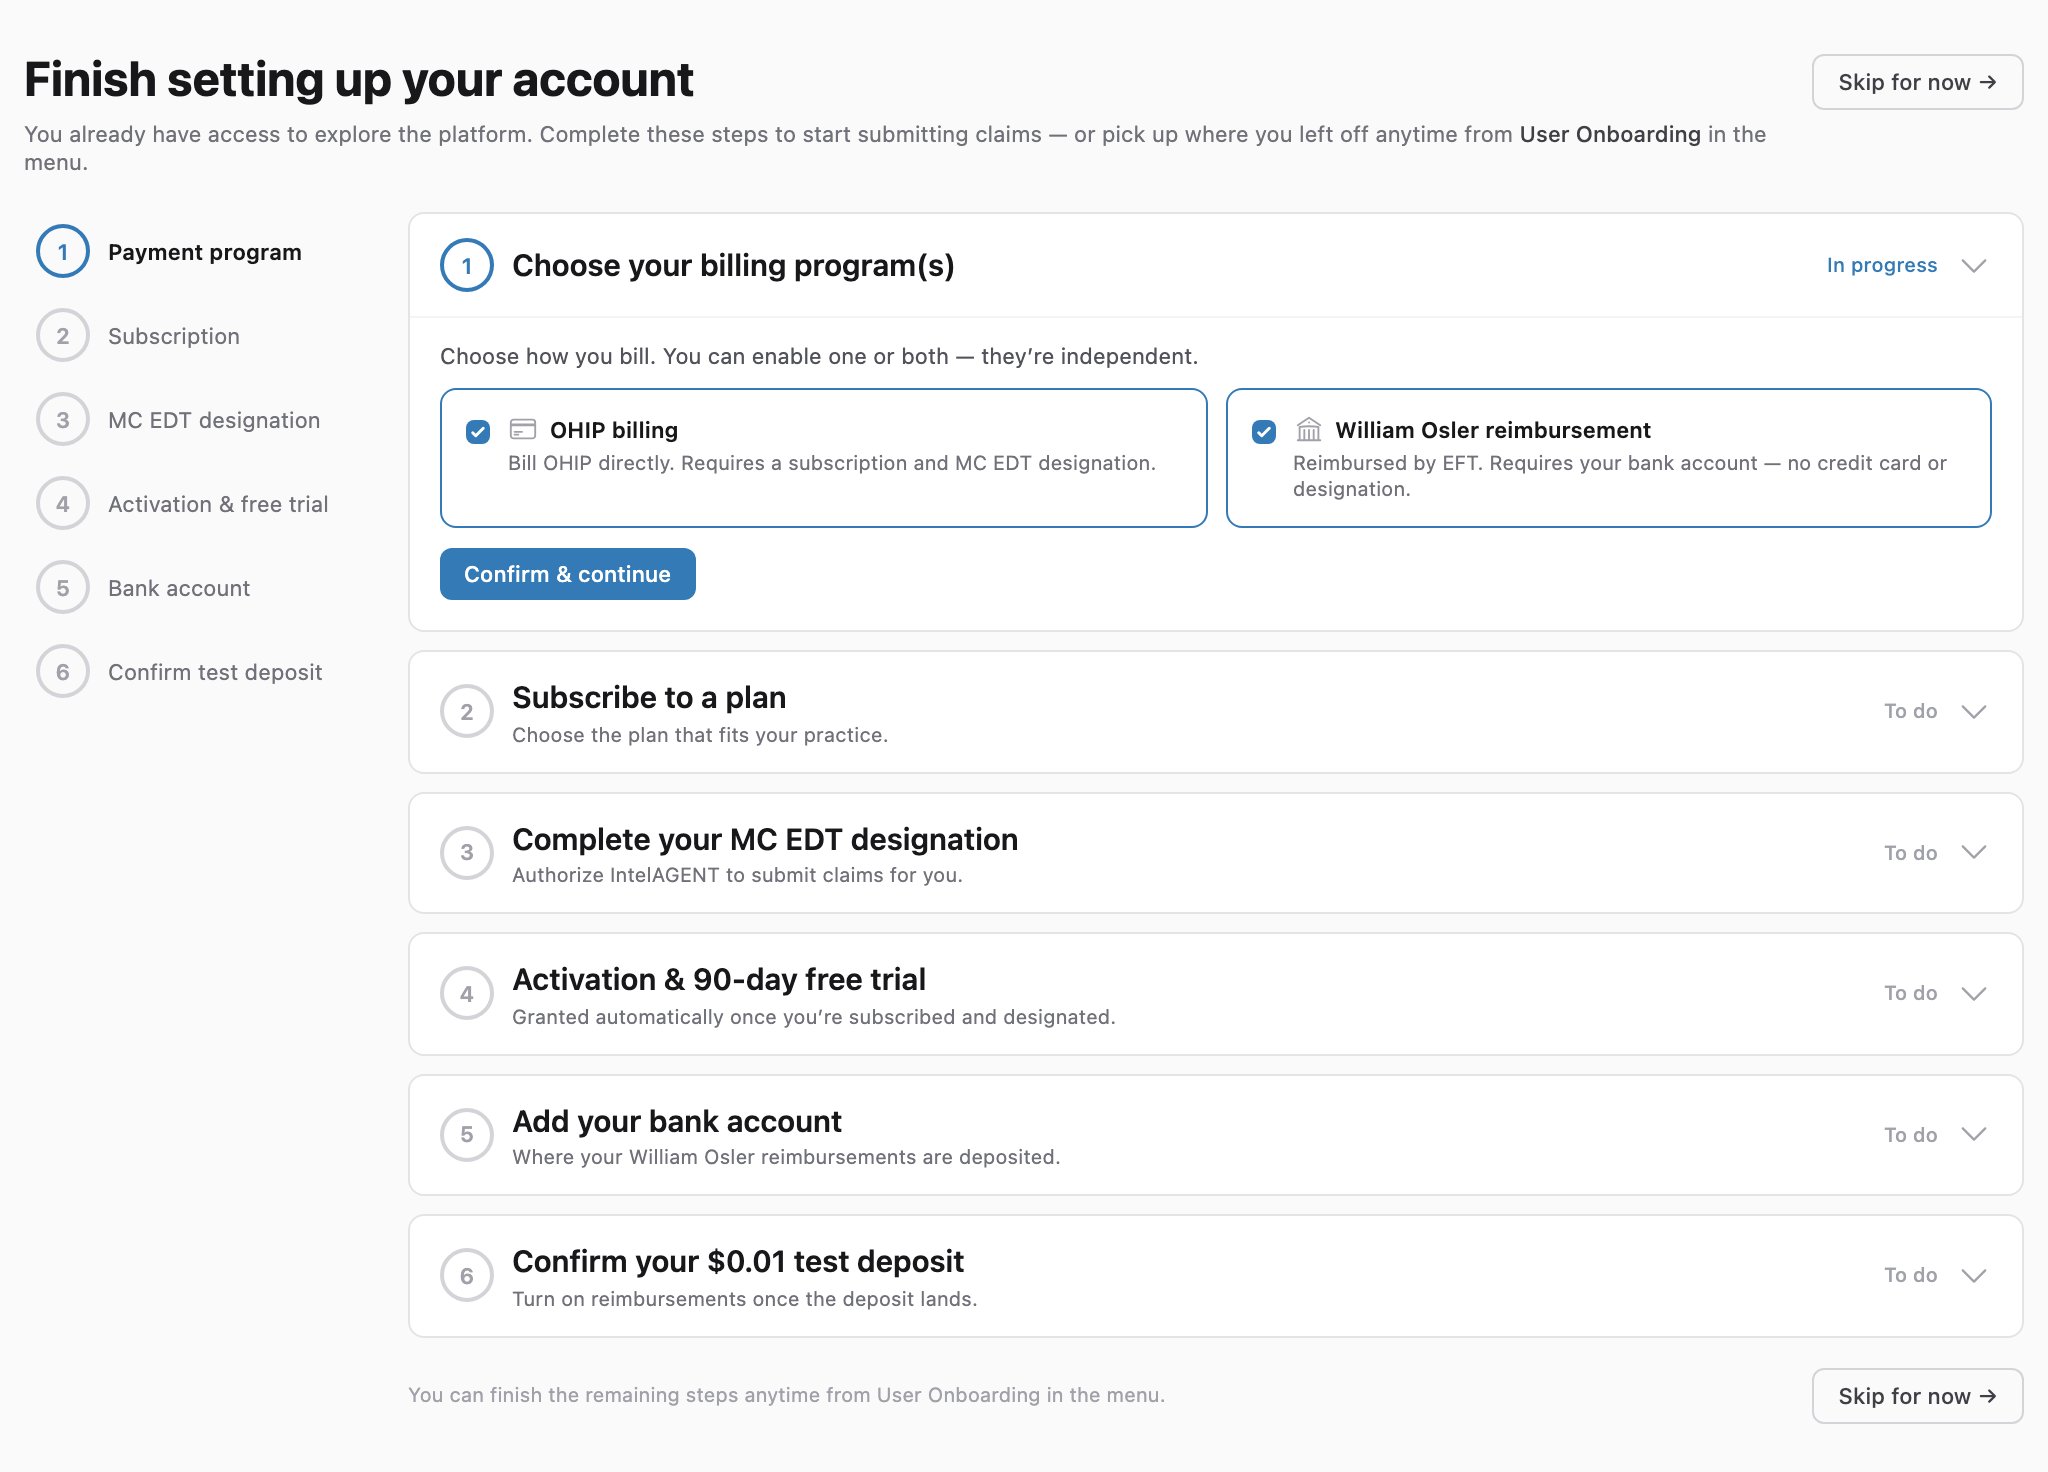 The two billing programs are **independent** — if you also bill OHIP directly, you can enable **OHIP billing** here too and complete the [OHIP Onboarding](/docs/getting-started/onboarding) steps.
## Step 2 — Add your bank account
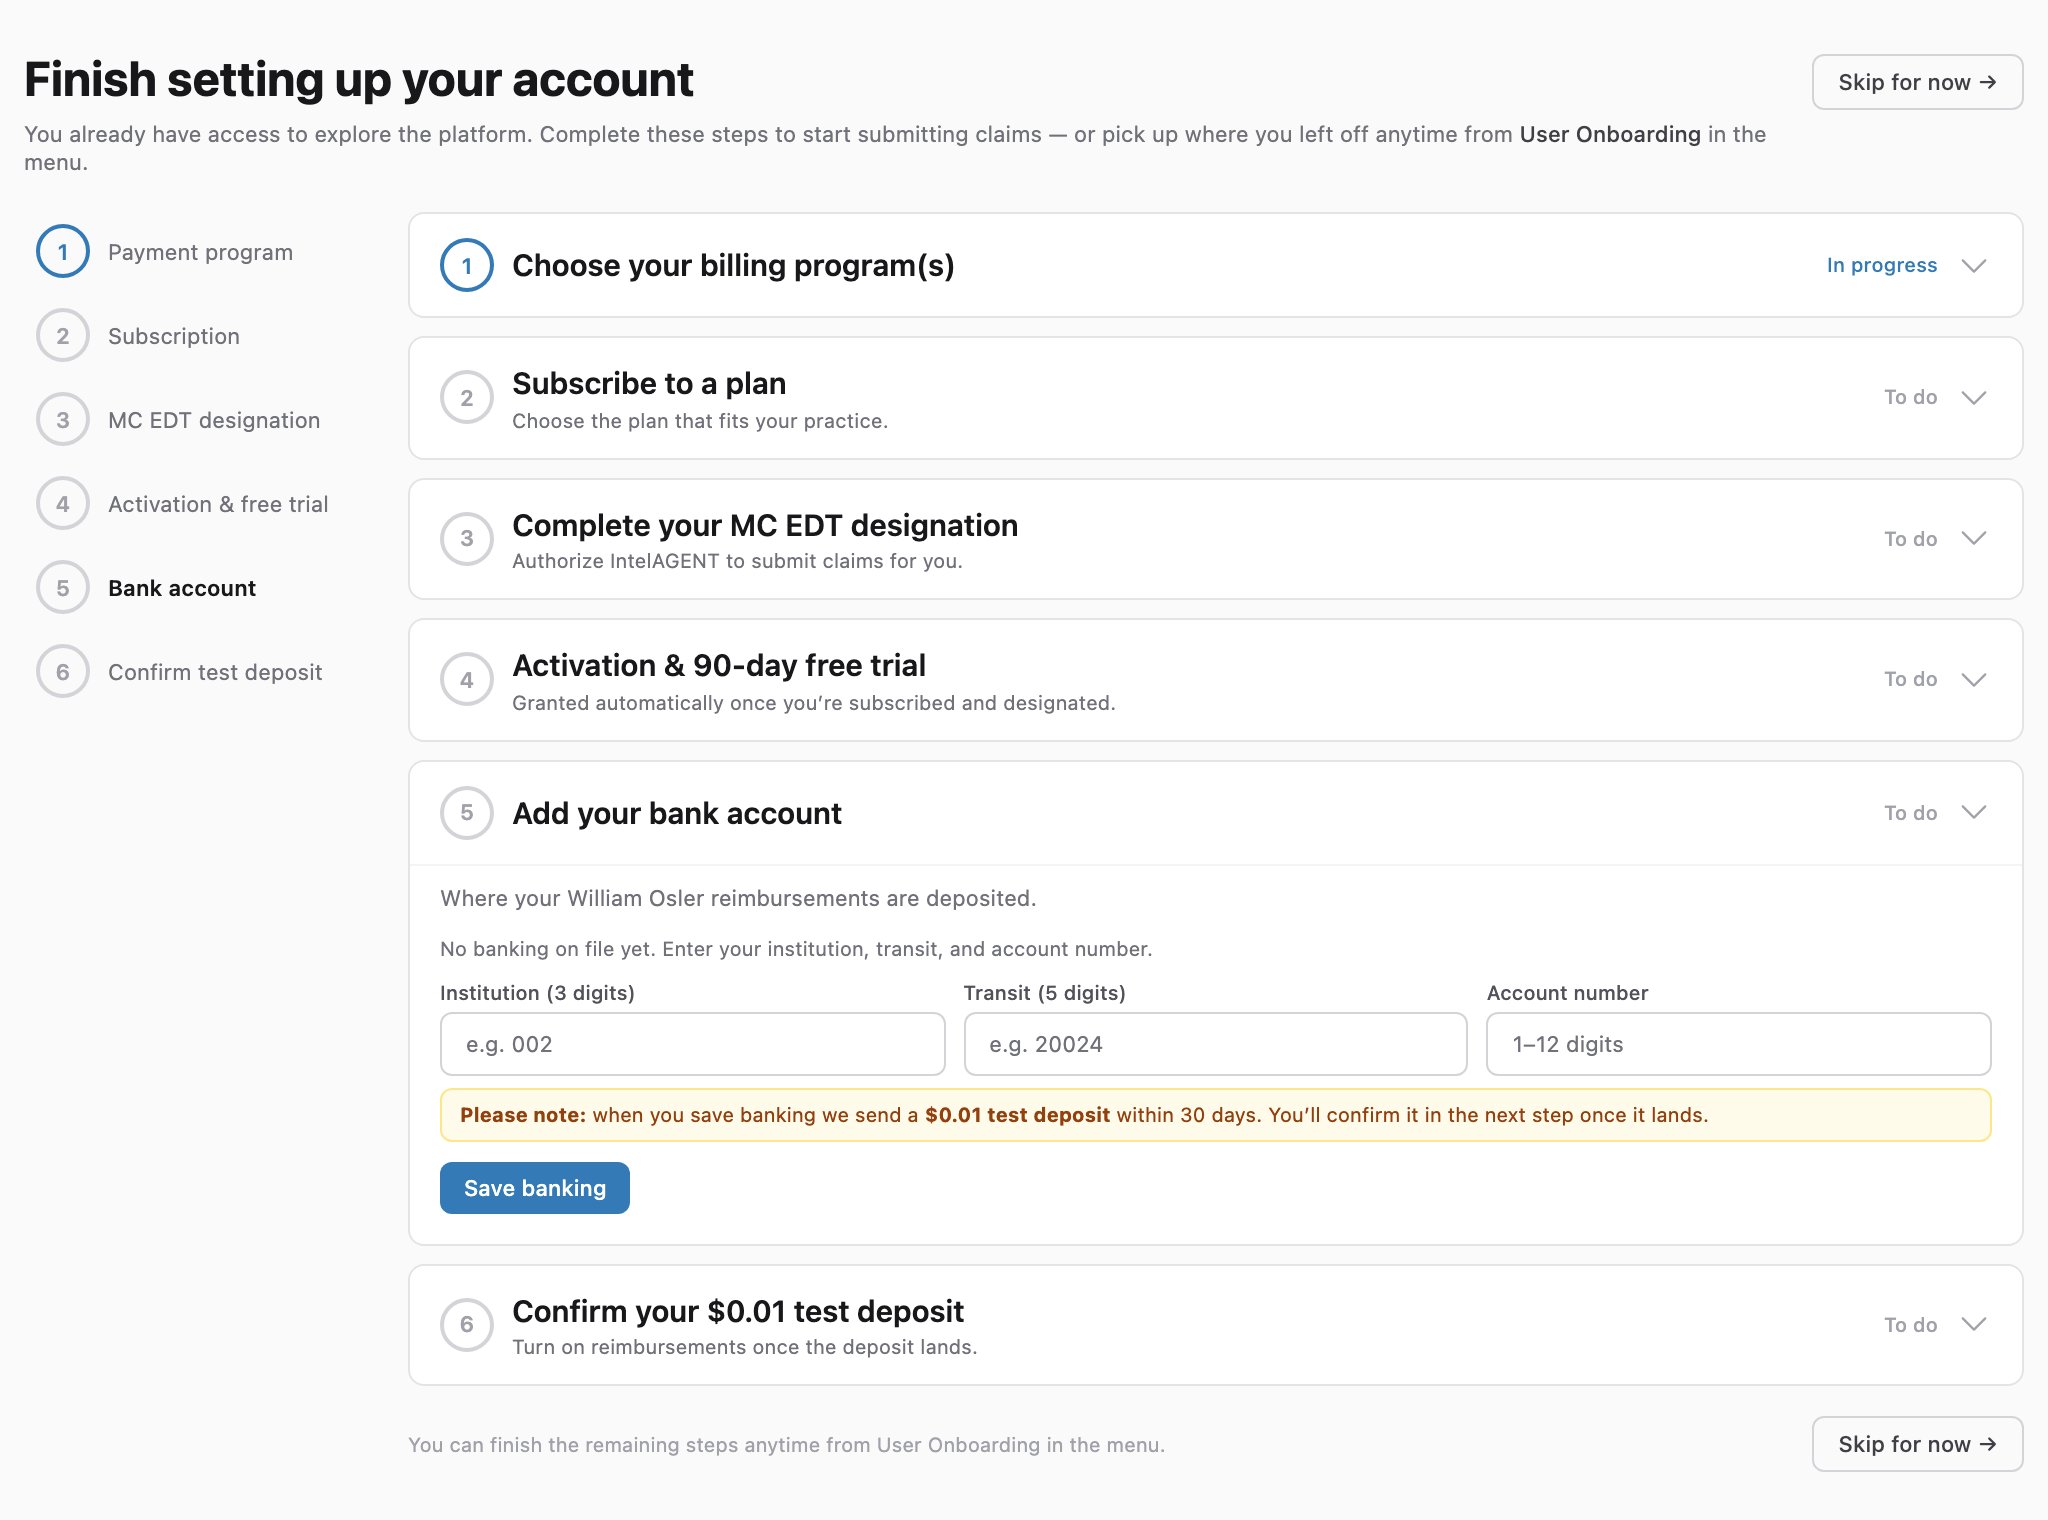
Enter your **institution** (3 digits), **transit** (5 digits), and **account number**. When you save, we send a **\$0.01 test deposit** to the account (it can take up to 30 days to appear).
The two billing programs are **independent** — if you also bill OHIP directly, you can enable **OHIP billing** here too and complete the [OHIP Onboarding](/docs/getting-started/onboarding) steps.
## Step 2 — Add your bank account
Enter your **institution** (3 digits), **transit** (5 digits), and **account number**. When you save, we send a **\$0.01 test deposit** to the account (it can take up to 30 days to appear).
 ## Step 3 — Confirm your \$0.01 test deposit
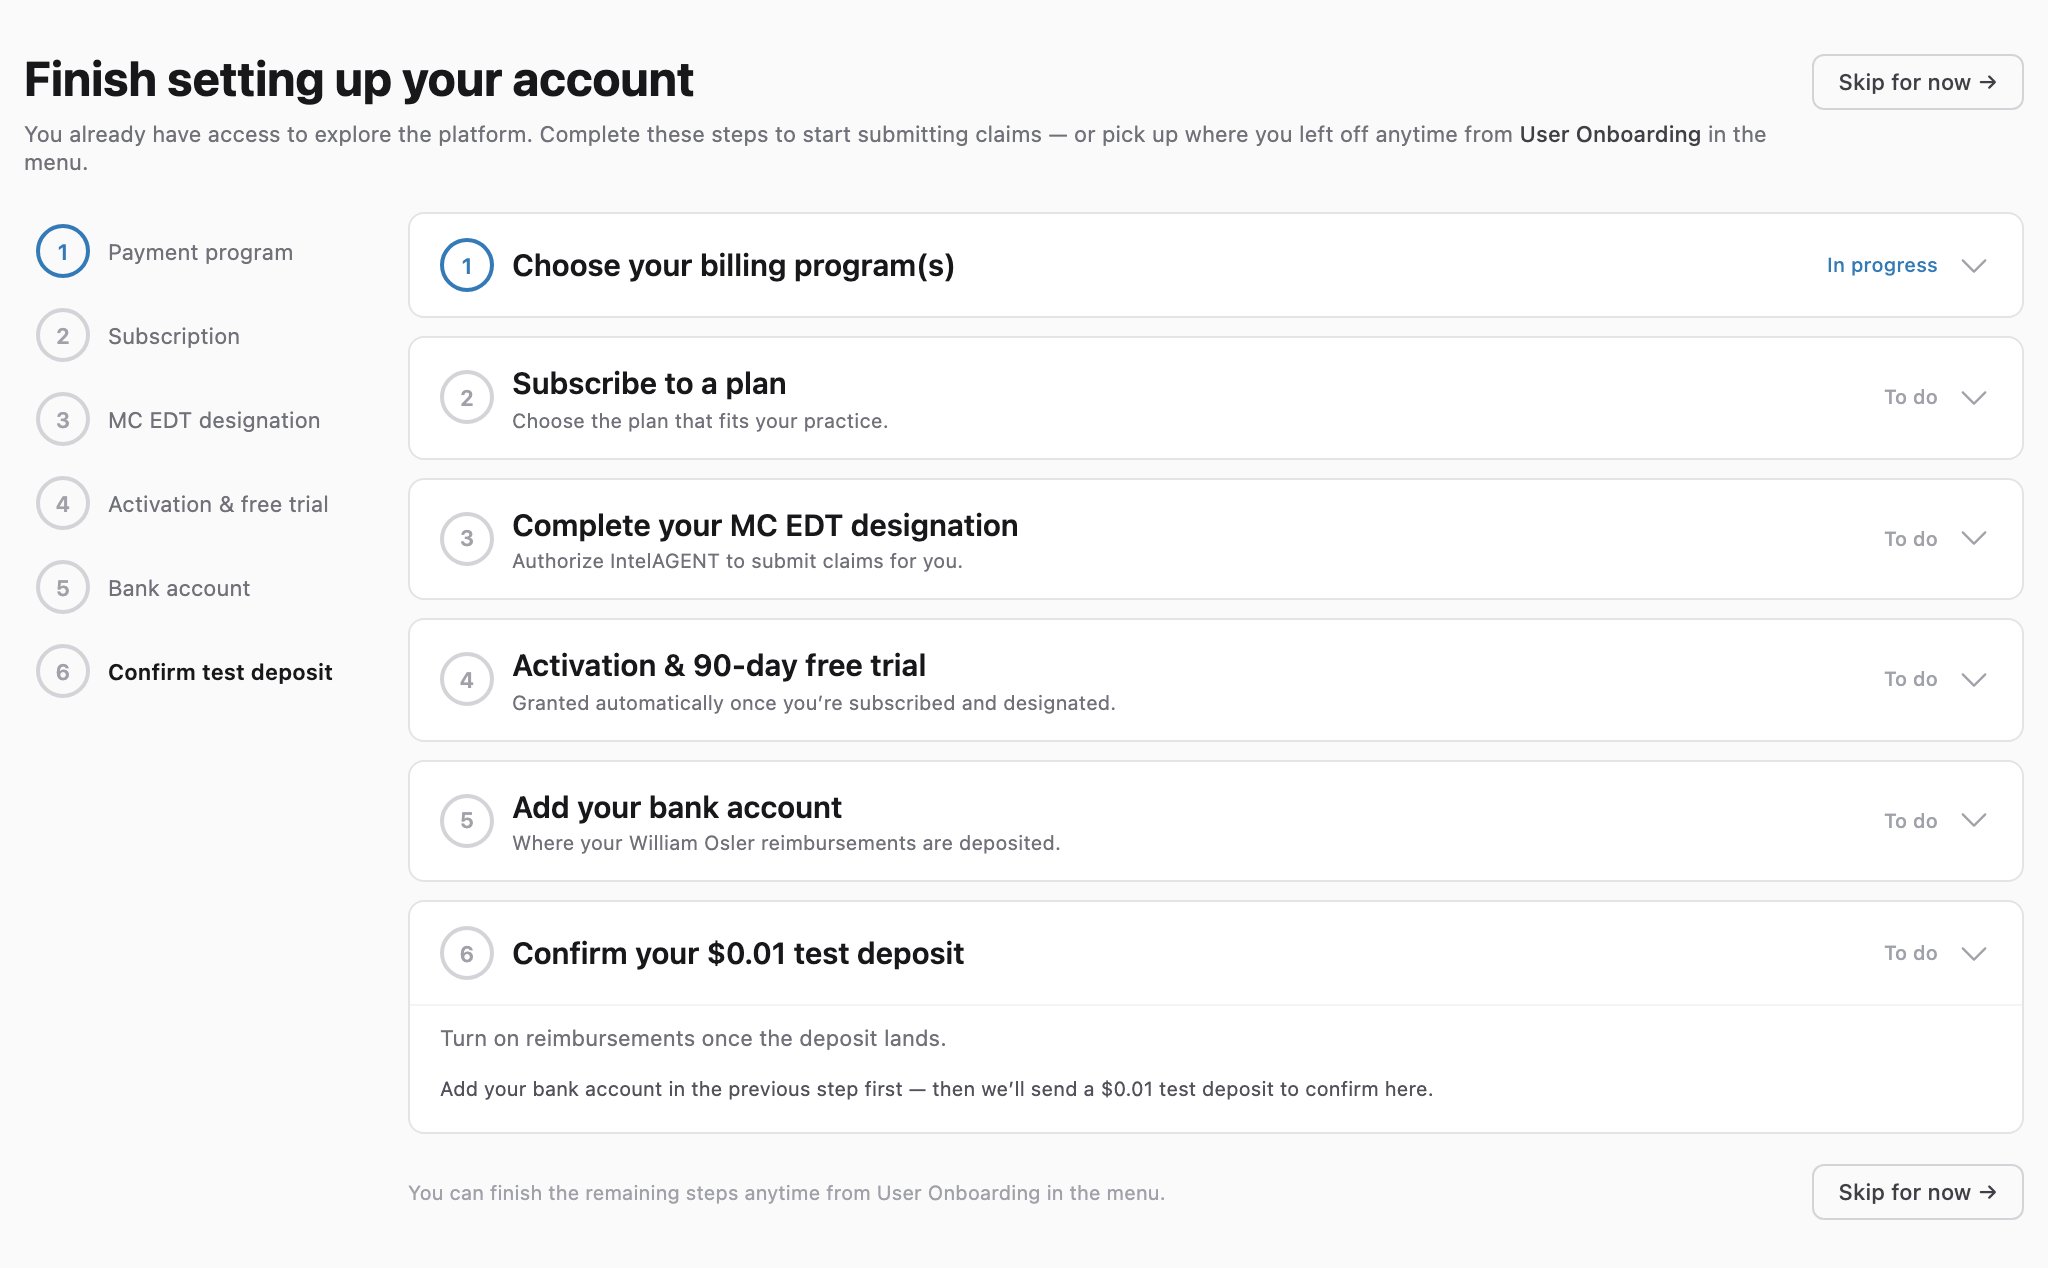
Once the test deposit appears on your statement, turn on **Bank account verified**. We don't send real reimbursements until this is on — and you can turn it off any time, for example if your banking details change.
## Step 3 — Confirm your \$0.01 test deposit
Once the test deposit appears on your statement, turn on **Bank account verified**. We don't send real reimbursements until this is on — and you can turn it off any time, for example if your banking details change.
 ## Tracking your progress
The left-hand step list shows the status of every step — completed steps are marked, and the current step is highlighted. When everything is done, the **User Onboarding** reminder in the user menu clears.
## Updating your banking later
You can change your bank account and toggle verification any time from **Settings**, on the web portal or the mobile app — see **[Updating Your Bank Account](/docs/william-osler/bank-account)**.
## Related
* [Updating Your Bank Account](/docs/william-osler/bank-account) — add or update your banking on desktop and mobile.
* [Remittance & Payment](/docs/william-osler/remittance-payment) — how and when reimbursements are paid.
* [OHIP Onboarding](/docs/getting-started/onboarding) — if you also bill OHIP directly.
## Tracking your progress
The left-hand step list shows the status of every step — completed steps are marked, and the current step is highlighted. When everything is done, the **User Onboarding** reminder in the user menu clears.
## Updating your banking later
You can change your bank account and toggle verification any time from **Settings**, on the web portal or the mobile app — see **[Updating Your Bank Account](/docs/william-osler/bank-account)**.
## Related
* [Updating Your Bank Account](/docs/william-osler/bank-account) — add or update your banking on desktop and mobile.
* [Remittance & Payment](/docs/william-osler/remittance-payment) — how and when reimbursements are paid.
* [OHIP Onboarding](/docs/getting-started/onboarding) — if you also bill OHIP directly.